WhatsApp AI Automation with n8n: Complete Step-by-Step Tutorial
Imagine a customer sending a message to your WhatsApp business number and getting an intelligent AI-generated response within seconds.
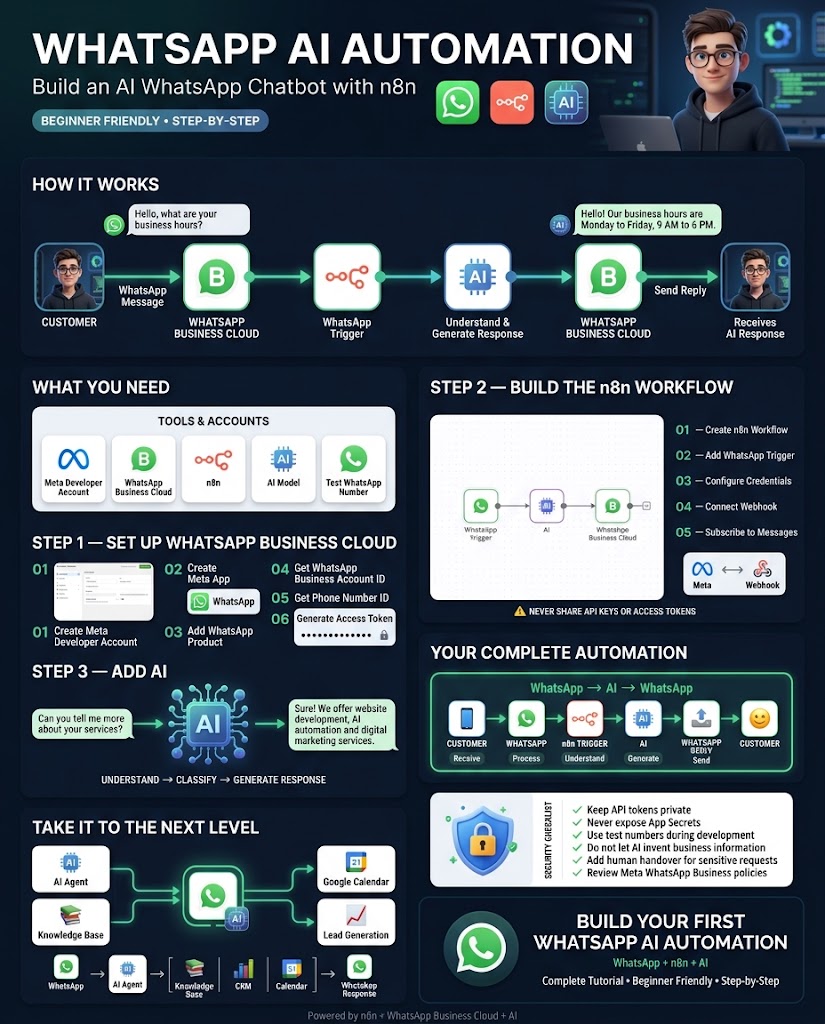
The customer sends a message, n8n receives it, AI understands the question, generates a suitable response, and n8n sends the answer back to WhatsApp automatically.
In this complete beginner-friendly tutorial, we will build a WhatsApp AI chatbot using n8n, Meta WhatsApp Business Cloud API, and an AI model.
We will build the following automation:
By the end of this tutorial, you will have a basic AI-powered WhatsApp automation that can understand incoming text messages and automatically respond to customers.
What Is WhatsApp AI Automation?
WhatsApp AI automation combines WhatsApp Business Cloud, n8n workflow automation, and artificial intelligence.
Instead of having a person manually answer every customer message, an AI-powered workflow can process messages automatically.
Hello, what are your business hours?
Hello! Our business hours are Monday to Friday, 9:00 AM to 6:00 PM. How can I help you today?
What We Are Going to Build
⚡ WhatsApp Trigger ↓
🤖 AI ↓
🧠 Understand ↓
✍️ Generate ↓
📲 WhatsApp Cloud ↓
💬 Customer gets reply
What You Need
- n8n account or self-hosted n8n instance
- Meta Developer account
- Meta Business Portfolio
- WhatsApp Business app/product configured through Meta
- WhatsApp Business Cloud API access
- WhatsApp Business Account ID
- WhatsApp Phone Number ID
- Meta access token
- AI API account, such as OpenAI
For production use, you should also configure your business information, phone number, permissions, and the appropriate Meta business verification/review requirements.
Step 1: Create Your Meta Developer Account
The first step is to create or access your Meta Developer account. Go to the Meta for Developers platform and sign in using your Facebook/Meta account.
Step 2: Create a Meta App
Inside the Meta for Developers dashboard, open My Apps, click Create App, select the appropriate business/app type, enter your application name, select your business portfolio, and create the application.
Step 3: Add WhatsApp to Your Meta App
Inside your Meta application dashboard, find the section for adding products, locate WhatsApp, select Set Up, and follow the setup process.
Step 4: Find Your WhatsApp Business Account ID
Open the WhatsApp configuration area and copy your WhatsApp Business Account ID.
Step 5: Get a WhatsApp Test Phone Number
For learning and testing, Meta provides a test WhatsApp setup in the developer environment. Use the WhatsApp API setup/quickstart area to configure the test phone number.
Step 6: Add Your Test Recipient Number
Add your own WhatsApp number as a test recipient and follow Meta’s verification process.
Step 7: Generate an Access Token
Open Meta Developer Dashboard → Your App → WhatsApp → API Setup, find the access token section, and generate or copy the token. Never publish your access token.
Step 8: Find Your Phone Number ID
In the WhatsApp API setup area, find Phone Number ID and copy it. Do not confuse it with other IDs.
Step 9: Open n8n
Log in to your n8n account, create a new workflow, and rename it WhatsApp AI Automation.
Step 10: Add the WhatsApp Trigger
Click Add first step, search for WhatsApp Trigger, and select the node.
Step 11: Create WhatsApp Trigger Credentials
Open the credential section inside the WhatsApp Trigger. The WhatsApp Trigger uses OAuth2 authentication; you’ll need your Meta App ID (Client ID) and Meta App Secret (Client Secret).
Step 12: Find Your Meta App ID
Return to your Meta Developer application, go to App Settings → Basic, and copy the App ID.
Step 13: Find Your Meta App Secret
In the same Meta application settings page, find App Secret, reveal/copy it, and enter it into the Client Secret field in n8n.
Step 14: Configure the WhatsApp Webhook
Open the WhatsApp Trigger node in n8n, copy the webhook URL, then return to Meta Developer Dashboard → Your App → WhatsApp → Configuration → Webhooks, and enter the n8n webhook URL as the callback URL.
Step 15: Configure the Verification Token
Use a unique random string for your verification token (e.g., my_n8n_whatsapp_verify_2026). Enter the token where Meta requests the verification token.
Step 16: Subscribe to the Messages Webhook
Locate the webhook fields/events, subscribe to messages, and save the configuration.
Step 17: Test the WhatsApp Trigger
Send a WhatsApp message from your authorized test recipient number to your WhatsApp test/business number. Check the n8n execution.
Message Text: {{ $json.messages[0].text.body }}Sender Number: {{ $json.messages[0].from }}Customer Name: {{ $json.contacts[0].profile.name }}
Step 18: Add the AI Node
Click the + button after the WhatsApp Trigger and add an AI/chat model node (e.g., OpenAI).
Step 19: Connect Your AI Credentials
Open the AI node, create or select your AI provider credentials, and keep your API key private.
Step 20: Create the AI System Instructions
You are a professional WhatsApp customer support assistant.

Your job is to answer customer messages clearly,
politely, and concisely.

Rules:
1. Answer only using information that is provided in the business knowledge or conversation.
2. Never invent prices, policies, delivery dates, discounts, product specifications, or guarantees.
3. If you do not know the answer, politely tell the customer that a human representative should assist.
4. Keep responses short because this is WhatsApp.
5. Use a friendly and professional tone.
6. Do not use unnecessary technical language.
7. Do not mention that you are an AI unless the customer specifically asks.
8. Do not make promises that the business has not explicitly authorized.

Customer message:
{{CUSTOMER_MESSAGE}}

Generate the best possible WhatsApp response.
Step 21: Map the WhatsApp Message to AI
Replace {{CUSTOMER_MESSAGE}} with the actual message field, e.g., {{ $json.messages[0].text.body }} (inspect your trigger output first).
Step 22: Test the AI
Send a message like “What time do you open tomorrow?” and run the AI step. The AI should respond appropriately.
Step 23: Add the WhatsApp Business Cloud Node
Click the + button after the AI node, search for WhatsApp Business Cloud, and select the node.
Step 24: Create WhatsApp Business Cloud Credentials
Open the credentials section, create a new API credential, and enter your API Access Token and Business Account ID.
Step 25: Configure the WhatsApp Send Message Operation
Inside the WhatsApp Business Cloud node, select the message-sending operation and the appropriate resource/operation for sending a text message.
Step 26: Set the Recipient Phone Number
Map the recipient to the sender number from the trigger: {{ $json.messages[0].from }} (check your payload).
Step 27: Add the AI Response
Map the output generated by your AI node into the WhatsApp message body field.
Step 28: Test the Complete Workflow
Send a WhatsApp message and verify that the entire flow works: trigger → AI → send response.
Step 29: Activate the Workflow
After successful testing, activate the n8n workflow and test with several different questions.
Step 30: Add Business Knowledge
Provide your AI with business information:
Business Name: ABC Digital Solutions
Business Hours: Monday-Friday, 9 AM-6 PM
Services: Website development, AI automation, SEO, Digital marketing
Refund Policy: Customers should contact support for refund-related requests.
Step 31: Improve the Workflow with an AI Agent
Upgrade to an AI Agent connected to tools like Google Sheets, Calendar, Gmail, CRM, database, etc.
Step 32: Add Human Handover
Implement an n8n IF or Switch node to detect human-support requests and notify a human agent.
Step 33: Add Message Classification
Classify messages (Sales, Support, Complaint, etc.) and route them accordingly.
Step 34: Add a CRM
Create or update CRM records for sales leads.
Step 35: Add Google Sheets
Log conversations in Google Sheets: Date | Customer | Phone | Message | AI Response | Category.
Step 36: Handle Unknown Questions Safely
Use a rule: if the answer is not available, do not guess—tell the customer a human representative will assist.
Step 37: Handle Media Messages
Extend the workflow to process images, voice messages, documents, etc., using AI Vision.
Step 38: Final Workflow
⚡ WhatsApp Trigger ↓
🧠 AI (Understand & Generate) ↓
📲 WhatsApp Business Cloud ↓
💬 Customer receives AI response
Common WhatsApp n8n Problems
Problem 1: WhatsApp Trigger Does Not Receive Messages
- Check Meta webhook URL, verification, and messages subscription.
- Ensure your workflow is active and credentials are valid.
Problem 2: AI Does Not Receive the Message
- Inspect the trigger output and map the correct field.
Problem 3: WhatsApp Does Not Send the Response
- Check access token, Business Account ID, Phone Number ID, recipient phone number, and node configuration.
Problem 4: Invalid Token
- Generate a new token or configure a long-lived token.
Problem 5: Webhook Verification Fails
- Check callback URL, verification token, correct Meta app, and public reachability of your n8n instance.
Important WhatsApp Business Rules
WhatsApp Business messaging is subject to Meta’s business messaging policies, templates, permissions, messaging windows, and other restrictions. Always test using Meta’s current documentation before deploying commercially.
Security Best Practices
- Never publish your Meta access token, App Secret, or AI API key.
- Use n8n credentials instead of hard-coding secrets.
- Use a test number while developing.
- Implement human handover for sensitive requests.
- Do not allow AI to invent business information.
- Keep customer data secure.
Conclusion
You have now built the foundation of a WhatsApp AI automation using n8n. The complete automation follows a simple but powerful pattern:
Once you understand this workflow, you can build much more advanced systems—connecting WhatsApp with CRMs, Google Sheets, Gmail, Google Calendar, databases, AI agents, and customer support systems.
Frequently Asked Questions
Can I use my personal WhatsApp number?
A normal personal WhatsApp account is not the same as a WhatsApp Business Platform/API integration. Use the supported WhatsApp Business Cloud/API setup provided through Meta.
Do I need coding knowledge?
No. n8n provides a visual workflow builder. However, understanding basic expressions and JSON becomes useful when you build more advanced WhatsApp automations.
Can I use OpenAI with WhatsApp?
Yes. n8n can connect an AI model to WhatsApp so that incoming messages are processed before the response is sent back to the customer.
Can the WhatsApp AI chatbot answer customer questions?
Yes. You can provide the AI with business information or connect it to a knowledge base.
Can WhatsApp AI book appointments?
Yes. With additional n8n nodes and an appropriate calendar integration, an AI agent can collect the required information and create appointments.
Can WhatsApp AI generate leads?
Yes. You can classify customer messages, identify potential leads, save their information in a CRM or Google Sheets, and notify your sales team automatically.
Can I connect WhatsApp to Google Sheets?
Yes. You can store customer messages, phone numbers, categories, AI responses, and other information in Google Sheets.
Can I create an AI customer support agent?
Yes. The workflow in this tutorial is the foundation for a more advanced AI customer support system.
Next Step: Build a Real AI WhatsApp Agent
AI Agent ↓
Knowledge Base CRM Google Calendar
WhatsApp Response
Recommended next tutorial: How to Build a WhatsApp AI Agent in n8n That Can Answer Questions, Qualify Leads, and Book Appointments.